Stonework
Curved rubble stone, radial coping
Techniques
Full-size templates, rope access
Pointing
Flush pointed, inside and out in traditional lime mortar
When we first saw this well it had no head. It was a flooded hole in the ground in front of a stone house.
We pumped it down, cleared the bottom, and rebuilt the top of the shaft and a new well head in curved rubble stone. A ring of tapered coping stones finishes the top.
The circle was set out full size on plywood and OSB templates. Part of the work inside the shaft was done from a harness on ropes.
As found
At ground level there was only a ragged hole, ringed with broken red brick, with water standing almost to the top. The house behind reflected in it. A length of corrugated pipe poked in at the rim.
Closer in, the top of a stone lining showed below the brick, coated black. An old iron pipe with a valve ran down into the water, and a hose was already in.
Pump-out and clear-out
We pumped the water down. That showed a round shaft lined in rubble stone, stained black and rust-brown. An old iron pipe and valve hung at the top, with cross-members lower down.
Then one of us went down in hi-vis waterproofs and a respirator to clear the black sludge at the bottom. By that point the old pipework was out.
Setting out
We set the well out full size on sheet templates. The large plywood disc is two sheets joined together, marked with concentric pencil circles.
A smaller OSB disc is divided by radial lines struck from a pin at the centre. A tapered plywood pattern, laid against its edge, gives the shape of a single coping stone.
Both discs turn up again on site once the stonework starts.
Rebuilding in curved rubble stone
The new stonework starts below ground. Looking inside, the new courses of stonework sit on top of the darker original lining.
We built the well head up in curved rubble stone, bedded in traditional lime mortar. The OSB disc sat in the opening while the first courses went round it. Higher up, it covered the open shaft while we worked. Stone was cut on site.
Radial coping stones
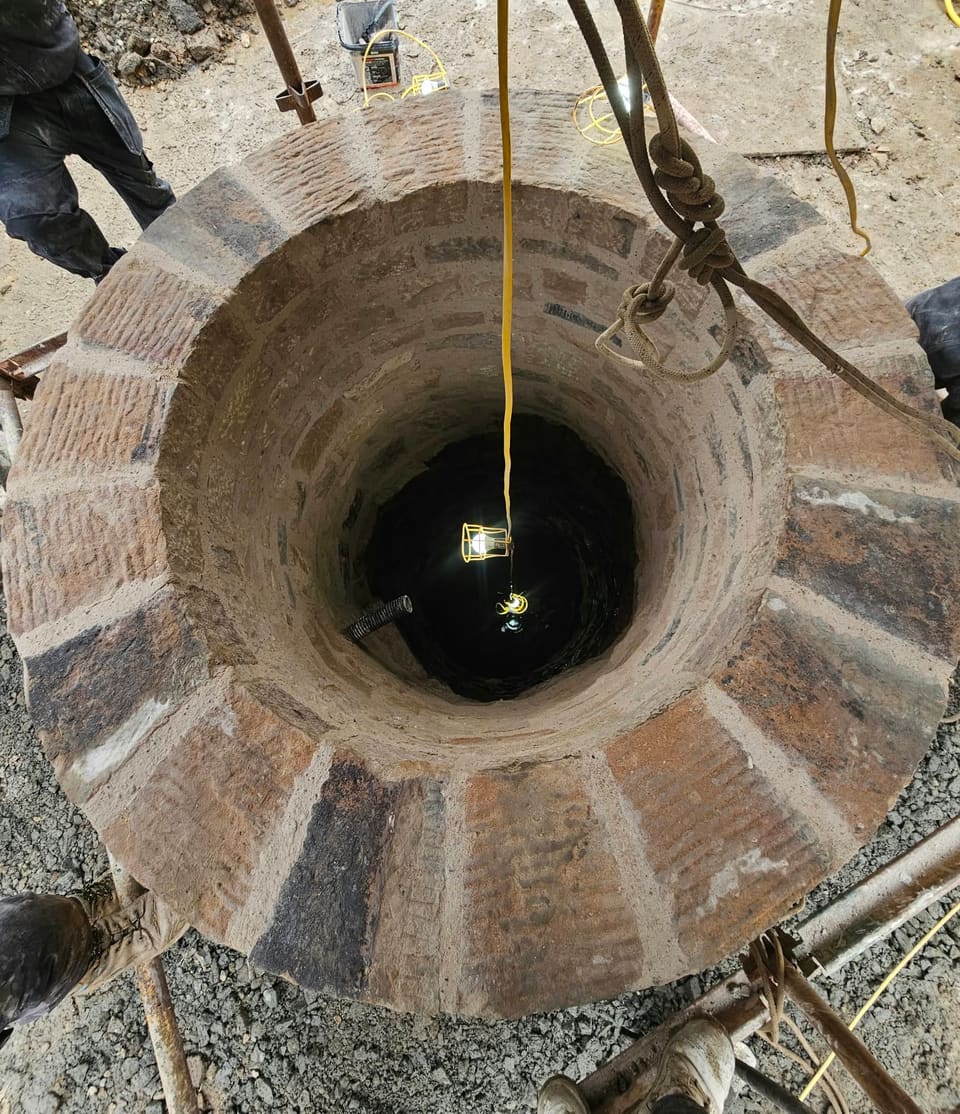
The well head is finished with a ring of tapered coping stones. Every joint runs on a radius from the centre of the shaft, the same layout as the lines on the template.
At this point the coping is bedded but the joints are still open.
Rope access
The inside of the shaft was reached on ropes. A scaffold frame went up over the well head and the ropes hung from it.
One of us went down in waterproofs and a harness to work on the inside face of the shaft.
With work lights lowered to the water, the join shows clearly. New stonework above, the original rubble lining below.
Pointing
With the stonework up, we pointed the well head, the coping and the inside face of the new stonework. The joints are finished flush in traditional lime mortar.
From above, the coping reads as a full ring of tapered stones with broached tops. The pointed inside face runs down into the shaft.
The pointing was done under a sheeted scaffold, and crushed stone was laid round the base.
Fitting the water pipe
Once the pointing was done, we fitted a water pipe down the shaft. One of us went down on ropes again to fix a blue pipe to the inside face, clipping it to the stone down to the water at the bottom.
Looking up from the bottom, the pipe runs up the original rubble lining to the new stonework at the top of the shaft, with the rope frame over the opening.
Complete
With the scaffold and sheeting gone, the finished well head stands on its own in the garden, ringed by crushed stone, in front of the same low stone building as in the first photo.
The result
Before & after
Flooded hole to finished well head